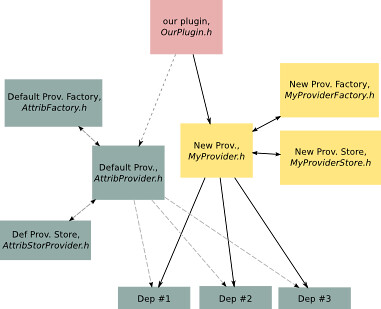
Here's the diagram showing what I alter to allow my plugin to do things that the default Provider won't allow it to do:
Something like that...
#!/bin/bash
make source1.rmlib
make source2.rmlib

#and so on..
SRC.cc := source1.cc source2.cc
PLUGIN := yes
PLUGINDEP := MySourcePlugin

OWNC++FLAGS := -DYOURFLAG1 -DYOURFLAG2

MODDEP := uiODMain
include make.od.Defaults
include make.Targets
#include "plugins.h"

extern "C" int GetXXXPluginType()
{
    return PI_AUTO_INIT_EARLY;
}

extern "C" int GetXXXPluginInfo()
{
    static PluginInfo retpi ={
        "Plugin Name",
        "Author",
        "Version Number",
        "Description" };
    return &retpi;
}
Annotations
Madagascar
uiMadagascar
CmdDriver
GMT
uiGMT
chmod +x [filename]
tar -xf [extracted downloaded files]
Utilities > Tools > Create Devel. Env.
To Install: (currently trying Hardy's release)
gcc-3.x.x
- gcc-3.4.x-base
- cpp-3.4.x
- gcc-3.4.x
- g++-3.4.x
- libstdc++6-dev (=3.4)
Note
Adding repository & Installing (GUI way, using hardy package):
1. software-properties-gtk &
2. add deb http://ubuntu.pesat.net.id/archive/ hardy main universe
3. Update
4. synaptic &
5. Search & install g++-3.4
6. Done
Some extras: (earlier package search)
2. INSTALLATION
================

1. Untar the archive into the folder `~/pcsharp' (or any other folder)

2. Compilation (It`s supposed that pcs (Mono) and gcc (C++ compiler)
had already been installed on your system).
cd ~/pcsharp
make

3. Add the following environment variables:

$PCSHARPPATH - the main directory of Parallel C# is located here
$MONO_PATH   - Mono will search for assemblies in these directories
$PATH        - add here the directory `~/pcsharp/bin'

If you use bash, you can do it by adding the following lines
into files `~/.bashrc' and `~/.bashrc_profile' in the following order:

export PCSHARPPATH=/home/yourhomedir/pcsharp
export MONO_PATH=$PCSHARPPATH/bin:$MONO_PATH
export PATH=$PCSHARPPATH/bin:$PATH


3. Runtime Initialization
=========================

This version of runtime uses `rsh', `ssh' or possibly other types of rsh-compatible
remote shells for initialization on the nodes of cluster.
rsh/ssh must be configured for transparrent logging into the nodes of the cluster
from frontend.
There`s a `pcsboot' utility in this package for cluster initialization.
It has only one optional parameter - the name of the file, that contains
the names of the cluster nodes (each node must be on the separate line).
File `$PCSHARPPATH/bin/nodes' will be loaded when this parameter is omitted.

Usage example:
 pcsboot $PCSHARPPATH/bin/nodes
or
 pcsboot

4. Finalization of Runtime
==========================

When you finish your work with the cluster, you should finalize the
Runtime on the nodes. Command `pcshalt' is dedicated for this task.

5. Additional Tools
===================

To find out which nodes are being used by Parallel C# Runtime currently use `pcsnodes' command.
It prints the list of nodes.

To execute some task on all nodes of your cluster use command `do-all'.
For example:
 do-all killall -9 mono

This command will kill all mono applications on your cluster.

Note: `do-all' utility executes the same command on all nodes that are listed in file
`$PCSHARPPATH/bin/nodes'.

6. Compiling your Parallel C# programs
======================================

In this package there`s a compiler called `pcsc' for
compilation of Parallel C# programs. There`re two stages of compilation:
- Parallel C#-code is translated into C# code
- C# code is compiled by `gmcs' compiler (from Mono platform).

Note:
 all parameters for `pcsc' compiler are passed to C# compiler (gmcs)

Examples of usage
 pcsc fib.pcs
 pcsc fib.pcs /out:myfib.exe
 pcsc /t:library fib.pcs

You can compile Parallel C# programs into DLLs
 pcsc a.pcs /t:library /out:a.dll

Then you can include it into the program
 pcsc /r:a.dll b.pcs

You can mix Parallel C# and C# files
 pcsc a.pcs b.cs

Or compile several Parallel C# files at a time
 pcsc a.pcs b.pcs

If you need only to translate Parallel C# files into C# code you can use option `/parseonly'.

7. Starting your Parallel C# programs
=====================================

Local mode:
 mono fib.exe 35

This will start program in local mode, i.e. movable methods will be executed as new threads.
No network operations will occur.

Distributed mode:
 mono fib.exe 35 /np 35

This will start program in distributed mode on 35 processors.
In this case movable methods will be transferred across the network.
Langkahnya:
1. Alt+F2
2. Masukkan perintah nm-applet
3. Enjoy